Documentation
Expose a local web server to the internet
ngrok allows you to expose a web server running on your local machine to the internet. Just tell ngrok what port your web server is listening on.
If you don't know what port your web server is listening on, it's probably port 80, the default for HTTP.
Example: Expose a web server on port 80 of your local machine to the internet
ngrok http 80When you start ngrok, it will display a UI in your terminal with the public URL of your tunnel and other status and metrics information about connections made over your tunnel.
The ngrok console UI
ngrok by @inconshreveable

Tunnel Status                 online
Version                       2.0/2.0
Web Interface                 http://127.0.0.1:4040
Forwarding                    http://92832de0.ngrok.io -> localhost:80
Forwarding                    https://92832de0.ngrok.io -> localhost:80

Connnections                  ttl     opn     rt1     rt5     p50     p90
                              0       0       0.00    0.00    0.00    0.00
Inspecting your traffic
ngrok provides a real-time web UI where you can introspect all of the HTTP traffic running over your tunnels. After you ve started ngrok, just open http://localhost:4040 in a web browser to inspect request details.
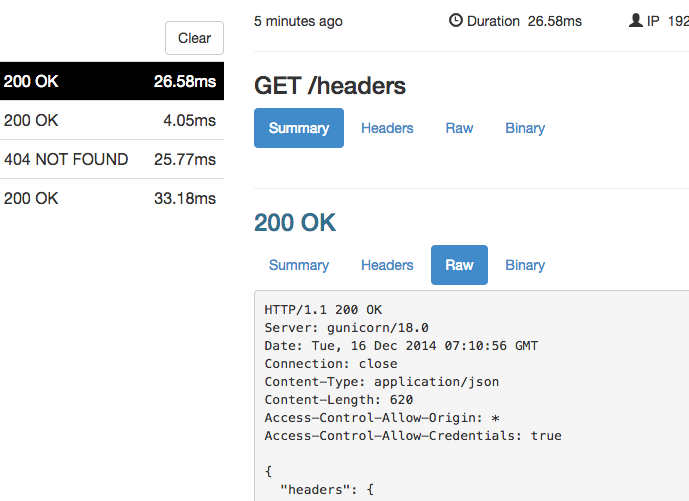
Try making a request to your public URL. After you have, look back at the inspection UI. You will see all of the details of the request and response including the time, duration, headers, query parameters and request payload as well as the raw bytes on the wire.
Detailed introspection of HTTP requests and responses
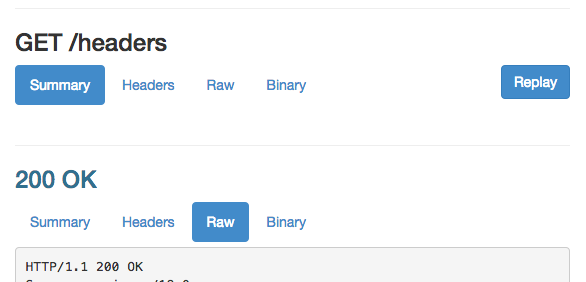
Replaying requests
Developing for webhooks issued by external APIs can often slow down your development cycle by requiring you do some work, like dialing a phone, to trigger the hook request. ngrok allows you to replay any request with a single click dramatically speeding up your iteration cycle. Click the Replay button at the top-right corner of any request on the web inspection UI to replay it.
Replay any request against your tunneled web server with one click
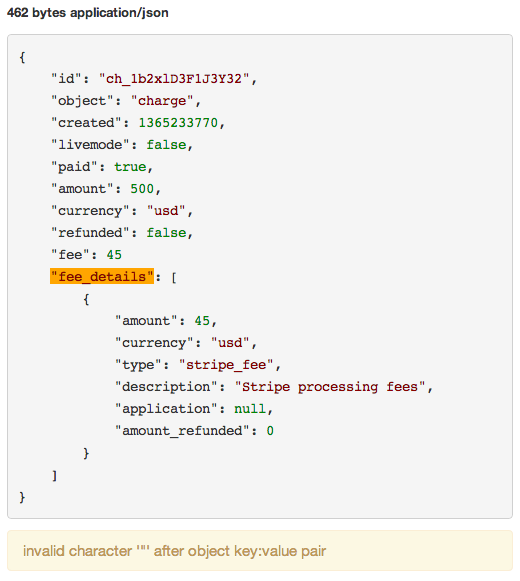
Request body validation
ngrok has special support for the most common data interchange formats in use on the web. Any XML or JSON data in request or response bodies is automatically pretty-printed for you and checked for syntax errors.
The location of a JSON syntax error is highlighted
Installing your Authtoken
Many advanced features of the ngrok.com service described in further sections require
that you sign up for an account. Once you ve signed
up, you need to configure ngrok with the authtoken that appears on your dashboard. This
will grant you access to account-only features. ngrok has a simple 'authtoken' command
to make this easy. Under the hood, all the authtoken command does is to add (or modify)
the authtoken property in your ngrok configuration file.
Install your authtoken
ngrok authtoken <YOUR_AUTHTOKEN>HTTP Tunnels
Custom subdomain names
ngrok assigns random hexadecimal names to the HTTP tunnels it opens for you.
This is okay for one-time personal uses. But if you re displaying the URL at a hackathon
or integrating with a third-party webhook, it can be frustrating if the tunnel name
changes or is difficult to read. You can specify a custom subdomain for your tunnel URL
with the -subdomain switch.
Example: Open a tunnel with the subdomain 'inconshreveable'
ngrok http -subdomain=inconshreveable 80ngrok by @inconshreveable
...
Forwarding http://inconshreveable.ngrok.io -> 127.0.0.1:80
Forwarding https://inconshreveable.ngrok.io -> 127.0.0.1:80Password protecting your tunnel
Anyone who can guess your tunnel URL can access your local web server unless you
protect it with a password. You can make your tunnels secure with the
-auth switch. This enforces HTTP Basic Auth on all requests with the
username and password you specify as an argument.
Example: Password-protect your tunnel
ngrok http -auth="username:password" 8080Tunnels on custom domains (white label URLs)
Instead of your tunnel appearing as a subdomain of ngrok.io, you can run ngrok
tunnels over your domains. To run a tunnel over dev.example.com, follow
these steps:
- Enter
dev.example.comas a Reserved Domain on the Reserved tab of your ngrok.com dashboard. This guarantees that no one else can hijack your domain name with their own tunnel. - On your dashboard, click on the 'CNAME' icon to copy your CNAME target.
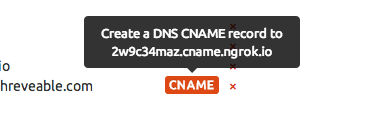
- Create a DNS CNAME record from
dev.example.comto your CNAME target. In this example, we would point the CNAME record to2w9c34maz.cname.ngrok.io - Invoke ngrok with the
-hostnameswitch and specify the name of your custom domain as an argument. Make sure the-regionyou specify matches the region in which you reserved your domain.Example: Run a tunnel over a custom domain
ngrok http -region=us -hostname=dev.example.com 8000
Disabling Inspection
ngrok records each HTTP request and response over your tunnels for inspection
and replay. While this is really useful for development, when you're running ngrok
on production services, you may wish to disable it for security and performance.
Use the -inspect switch to disable inspection on your tunnel.
Example: An http tunnel with no inspection
ngrok http -inspect=false 80Rewriting the Host header
When forwarding to a local port, ngrok does not modify the tunneled HTTP requests at all,
they are copied to your server byte-for-byte as they are received. Some application servers
like WAMP, MAMP and pow use the Host header for determining which development
site to display. For this reason, ngrok can rewrite your requests with a modified Host
header. Use the -host-header switch to rewrite incoming HTTP requests.
If rewrite is specified, the Host header will be rewritten to
match the hostname portion of the forwarding address. Any other value will cause the Host
header to be rewritten to that value.
Rewrite the Host header to 'site.dev'
ngrok http -host-header=rewrite site.dev:80Rewrite the Host header to 'example.com'
ngrok http -host-header=example.com 80Tunneling only HTTP or HTTPS
By default, when ngrok runs an HTTP tunnel, it opens endpoints for both HTTP
and HTTPS traffic. If you wish to only forward HTTP or HTTPS traffic, but not both,
you can toggle this behavior with the -bind-tls switch.
Example: Only listen on an HTTP tunnel endpoint
ngrok http -bind-tls=false site.dev:80Example: Only listen on an HTTPS tunnel endpoint
ngrok http -bind-tls=true site.dev:80Websockets
Websocket endpoints work through ngrok's http tunnels without any changes. However, there is currently no support for introspecting them beyond the initial 101 Switching Protocols response.
TLS Tunnels
HTTPS tunnels terminate all TLS (SSL) traffic at the ngrok.com servers using ngrok.com certificates. For production-grade services, you'll want your tunneled traffic to be encrypted with your own TLS key and certificate. ngrok makes this extraordinarily easy with TLS tunnels.
Forward TLS traffic to a local HTTPS server on port 443
ngrok tls -subdomain=encrypted 443Once your tunnel is running, try accessing it with curl.
curl --insecure https://encrypted.ngrok.ioTLS Tunnels without certificate warnings
Notice that --insecure option in the previous curl command example? You need to specify that because
your local HTTPS server doesn't have the TLS key and certificate necessary to terminate traffic for any ngrok.io
subdomains. If you try to load up that page in a web browser, you'll notice that it tells you the page
could be insecure because the certificate does not match.
If you want your certificates to match and be protected from man-in-the-middle attacks, you need two things.
First, you'll need to buy an SSL (TLS) certificate for a domain name that you own and configure your
local web server to use that certificate and its private key to terminate TLS connections. How to do
this is specific to your web server and SSL certificate provider and beyond the scope of this
documentation. For the sake of example, we'll assume that you were issued an SSL certificate for the domain
secure.example.com.
Once you have your key and certificate and have installed them properly, it's now time to run a
a TLS tunnel on your own custom domain name. The instructions to set this up are identical to those
described in the HTTP tunnels section: Tunnels on custom domains. The
custom domain you register should be the same as the one in your SSL certificate (secure.example.com). After
you've set up the custom domain, use the -hostname argument to start the TLS
tunnel on your own domain.
Forward TLS traffic over your own custom domain
ngrok tls -region=us -hostname=secure.example.com 443Terminating TLS connections
It's possible that the service you're trying to expose may not have the capability to terminate TLS connections.
The ngrok client can do this for you so that you can encrypt your traffic end-to-end but not have to worry about
whether the local service has TLS support. Specify both the -crt and -key command line
options to specify the filesystem paths to your TLS certificate and key and the ngrok client will take care of
terminating TLS connections for you.
Offload TLS Termination to the ngrok client
ngrok tls -region=us -hostname secure.example.com -key /path/to/tls.key -crt /path/to/tls.crt 80Running non-HTTP services over TLS tunnels
ngrok TLS tunnels make no assumptions about the underlying protocol being transported. All examples in this documentation use HTTPS because it is the most common use case, but you can run run any TLS-wrapped protocol over a TLS tunnel (e.g. imaps, smtps, sips, etc) without any changes.
Compatible Clients
TLS tunnels work by inspecting the data present in the Server Name Information (SNI) extension on incoming TLS connections. Not all clients that initiate TLS connections support setting the SNI extension data. These clients will not work properly with ngrok's TLS tunnels. Fortunately, nearly all modern browsers use SNI. Some modern software libraries do not though. The following list of clients do not support SNI and will not work with TLS tunnels:
- Microsoft Internet Explorer 6.0
- Microsoft Internet Explorer 7 & 8 on Windows XP or earlier
- Native browser on Android 2.X
- Java <=1.6
- Python 2.X, 3.0, 3.1 if required modules are not installed
TCP Tunnels
Not all services you wish to expose are HTTP or TLS based. ngrok TCP tunnels allow you to expose any networked service that runs over TCP. This is commonly used to expose SSH, game servers, databases and more. Starting a TCP tunnel is easy.
Expose a TCP based service running on port 1234
ngrok tcp 1234Examples
Expose an SSH server listening on the default port
ngrok tcp 22Expose a Postgres server listening on the default port
ngrok tcp 5432Expose a Minecraft server listening on the default port
ngrok tcp 25565Listening on a reserved remote address
Normally, the remote address and port is assigned randomly each time you start a TCP tunnel. For
production services (and convenience) you often want a stable, guaranteed remote address. To do this,
first, log in to your ngrok.com dashboard and click "Reserve Address" in the "Reserved TCP Addresses"
section. Then use the -remote-addr option when invoking ngrok to bind a tunnel
on your reserved TCP address. Make sure the -region you specify matches the region in which
you reserved your address.
Bind a TCP tunnel on a reserved remote address
ngrok tcp --region=us --remote-addr 1.tcp.ngrok.io:20301 22More Tunneling Options
Wildcard domains
ngrok permits you to bind HTTP and TLS tunnels to wildcard domains. All wildcard domains,
even those that are subdomains of ngrok.io must first be reserved for your account on your dashboard.
When using -hostname or -subdomain, specify a leading asterisk
to bind a wildcard domain.
Bind a tunnel to receive traffic on all subdomains of example.com
ngrok http --region=us --hostname *.example.com 80Wildcard domain rules
The use of wildcard domains creates ambiguities in some aspects of the ngrok.com service. The following rules are used to resolve these situations and are important to understand if you are using wildcard domains.
For the purposes of example, assume you have reserved the address *.example.com for your account.
- Connections to nested subdomains (e.g.
foo.bar.baz.example.com) will route to your wildcard tunnel. - You may bind tunnels on any valid subdomain of
example.comwithout creating an additional reserved domain entry. - No other account may reserve
foo.example.comor any other subdomain that would match a wildcard domain reserved by another account. - Connections are routed to the most specific matching tunnel online. If you are running tunnels for both
foo.example.comand*.example.com, requests tofoo.example.comwill always route tofoo.example.com
Forwarding to servers on a different machine (non-local services)
ngrok can forward to services that aren't running on your local machine. Instead of specifying a port number, just specify a network address and port instead.
Example: Forward to a web server on a different machine
ngrok http 192.168.1.1:8080Global infrastructure
ngrok runs globally distributed tunnel servers around the world to enable fast, low latency traffic to your applications.
Locations
ngrok runs tunnel servers in datacenters around the world. The location of the datacenter within a given region may change without notice (e.g. the European servers may move from Frankfurt to London).
-
us - United States (Ohio)
-
eu - Europe (Frankfurt)
-
ap - Asia/Pacific (Singapore)
-
au - Australia (Sydney)
Usage
If you do not explicitly pick a region, your tunnel will be hosted in the default region, the United States. Picking the region
closest to you is as easy as specifying setting the -region command line flag or setting the region property in your configuration file.
For example, to start a tunnel in the Europe region:
ngrok http -region eu 8080Reserved domains and reserved addresses are allocated for a specific region (the US region by default). When you reserve a domain or address, you must select a target region. You may not bind a domain or address reserved in another region other than the one it was allocated for. Attempting to do so will yield an error and prevent your tunnel session from initializing.
Limitations
An ngrok client may only be connected a single region. This may change in the future, but at the moment a single ngrok client can not host tunnels in multiple regions simultaneously. Run multiple ngrok clients if you need to do this.
A domain cannot be reserved for multiple regions simultaneously. It is not possible to geo-balance DNS
to the same tunnel name in multiple regions. Use region-specific subdomains or TLDs if you need to do this
(eu.tunnel.example.com, us.tunnel.example.com, etc).
IP Whitelisting Tunnel Access
You may whitelist access to tunnel endpoints on your account. The whitelist is enforced by the ngrok.com servers. It is applied globally to all of your tunnel endpoints. Any incoming connection to any of your tunnel endpoints is checked to guarantee that the source IP address of the connection matches at least one entry in your whitelist. If a connection does not match the whitelist it is terminated immediately and never forwarded to an ngrok client.
As a special case, if your whitelist is empty, all connections are allowed.
Managing the whitelist
You can manage the IP whitelist on the auth tab of your ngrok dashboard. Enter a new IP address under the "IP Whitelist" section and then click Add Whitelist Entry. Changes to the IP Whitelist can take up to 30 seconds to take effect.
IP Ranges
Sometimes, you may wish to whitelist an entire range of IPs. Instead of entering just a single IP address, you may instead specify a block of IP addresses using CIDR notation. For example, to allow all IP addresses from 10.1.2.0 to 10.1.2.255, you would add 10.1.2.0/24 to your whitelist.
The ngrok configuration file
Sometimes your configuration for ngrok is too complex to be expressed in command line options. ngrok supports an optional, extremely simple YAML configuration file which provides you with the power to run multiple tunnels simultaneously as well as to tweak some of ngrok's more arcane settings.
Configuration file location
You may pass a path to an explicit configuration file with the -config option. This is recommended
for all production deployments.
Explicitly specify a configuration file location
ngrok http -config=/opt/ngrok/conf/ngrok.yml 8000You may pass the -config option more than once. If you do, the first configuration is parsed and
each successive configuration is merged on top of it. This allows you to have per-project ngrok configuration files
with tunnel definitions but a master configuration file in your home directory with your authtoken and other
global settings.
Specify an additional configuration file with project-specific overrides
ngrok start -config ~/ngrok.yml -config ~/projects/example/ngrok.yml demo adminDefault configuration file location
If you don't specify a location for a configuration file, ngrok tries to read
one from the default location $HOME/.ngrok2/ngrok.yml. The configuration file
is optional; no error is emitted if that path does not exist.
In the default path, $HOME is the home directory for the current user as defined by your operating system.
It is not the environment variable $HOME, although they are often the same. For
major operating systems, if your username is example the default configuration would
likely be found at the following paths:
| OS X | /Users/example/.ngrok2/ngrok.yml
|
|---|---|
| Linux | /home/example/.ngrok2/ngrok.yml
|
| Windows | C:\Users\example\.ngrok2\ngrok.yml
|
Tunnel definitions
The most common use of the configuration file is to define tunnel configurations. Defining tunnel configurations is useful because you may then start pre-configured tunnels by name from your command line without remembering all of the right arguments every time.
Tunnels are defined as mapping of name -> configuration under the tunnels property
in your configuration file.
Define two tunnels named 'httpbin' and 'demo'
tunnels:
  httpbin:
    proto: http
    addr: 8000
    subdomain: alan-httpbin
  demo:
    proto: http
    addr: 9090
    hostname: demo.inconshreveable.com
    inspect: false
    auth: "demo:secret"
Start the tunnel named 'httpbin'
ngrok start httpbinEach tunnel you define is a map of configuration option names to values. The name of a configuration
option is usually the same as its corresponding command line switch. Every tunnel must define
proto and addr. Other properties are available and many are protocol-specific.
Tunnel Configuration Properties
proto
|
required
all
|
tunnel protocol name, one of http, tcp, tls |
|---|---|---|
addr
|
required
all
|
forward traffic to this local port number or network address |
inspect
|
all
|
enable http request inspection |
auth
|
http
|
HTTP basic authentication credentials to enforce on tunneled requests |
host_header
|
http
|
Rewrite the HTTP Host header to this value, or preserve to leave it unchanged |
bind_tls
|
http
|
bind an HTTPS or HTTP endpoint or both true, false, or both |
subdomain
|
http
tls
|
subdomain name to request. If unspecified, uses the tunnel name |
hostname
|
http
tls
|
hostname to request (requires reserved name and DNS CNAME) |
crt
|
tls
|
PEM TLS certificate at this path to terminate TLS traffic before forwarding locally |
key
|
tls
|
PEM TLS private key at this path to terminate TLS traffic before forwarding locally |
client_cas
|
tls
|
PEM TLS certificate authority at this path will verify incoming TLS client connection certificates. |
remote_addr
|
tcp
|
bind the remote TCP port on the given address |
Running multiple simultaneous tunnels
You can pass multiple tunnel names to ngrok start and ngrok will run them all
simultaneously.
Start three named tunnels from the configuration file
ngrok start admin ssh metricsngrok by @inconshreveable
Tunnel Status online
Version 2.0/2.0
Web Interface http://127.0.0.1:4040
Forwarding http://admin.ngrok.io -> 10.0.0.1:9001
Forwarding http://device-metrics.ngrok.io -> localhost:2015
Forwarding https://admin.ngrok.io -> 10.0.0.1:9001
Forwarding https://device-metrics.ngrok.io -> localhost:2015
Forwarding tcp://0.tcp.ngrok.io:48590 -> localhost:22
...You can also ask ngrok to start all of the tunnels defined in the configuration file with the
--all switch.
Start all tunnels defined in the configuration file
ngrok start --allConversely, you may ask ngrok to run without starting any tunnels with the --none
switch. This is useful if you plan to manage ngrok's tunnels entirely via the API.
Run ngrok without starting any tunnels
ngrok start --noneExample Configuration Files
Example configuration files are presented below. The subsequent section contains full documentation for all configuration parameters shown in these examples.
Run tunnels for multiple virtual hosted development sites
authtoken: 4nq9771bPxe8ctg7LKr_2ClH7Y15Zqe4bWLWF9p
tunnels:
  app-foo:
    addr: 80
    proto: http
    host_header: app-foo.dev
  app-bar:
    addr: 80
    proto: http
    host_header: app-bar.dev
Tunnel a custom domain over both http and https with your own certificate
authtoken: 4nq9771bPxe8ctg7LKr_2ClH7Y15Zqe4bWLWF9p
tunnels:
  myapp-http:
    addr: 80
    proto: http
    hostname: example.com
    bind_tls: false
  mypp-https:
    addr: 443
    proto: tls
    hostname: example.com
Expose ngrok's web inspection interface and API over a tunnel
authtoken: 4nq9771bPxe8ctg7LKr_2ClH7Y15Zqe4bWLWF9p
tunnels:
  myapp-http:
    addr: 4040
    proto: http
    subdomain: myapp-inspect
    auth: "user:secretpassword"
    inspect: false
Example configuration file with all options
authtoken: 4nq9771bPxe8ctg7LKr_2ClH7Y15Zqe4bWLWF9p
region: us
console_ui: true
compress_conn: false
http_proxy: false
inspect_db_size: 50000000
log_level: info
log_format: json
log: /var/log/ngrok.log
root_cas: trusted
socks5_proxy: "socks5://localhost:9150"
update: false
update_channel: stable
web_addr: localhost:4040
tunnels:
  website:
    addr: 8888
    auth: bob:bobpassword
    bind_tls: true
    host_header: "myapp.dev"
    inspect: false
    proto: http
    subdomain: myapp

  e2etls:
    addr: 9000
    proto: tls
    hostname: myapp.example.com
    crt: example.crt
    key: example.key

  ssh-access:
    addr: 22
    proto: tcp
    remote_addr: 1.tcp.ngrok.io:12345
Configuration Options
authtoken
This option specifies the authentication token used to authenticate this client when it connects to the ngrok.com service. After you've created an ngrok.com account, your dashboard will display the authtoken assigned to your account.
ngrok.yml specifying an authtoken
authtoken: 4nq9771bPxe8ctg7LKr_2ClH7Y15Zqe4bWLWF9pconsole_ui
true
|
enable the console UI | |
|---|---|---|
false
|
disable the console UI | |
iftty
|
default
|
enable the UI only if standard out is a TTY (not a file or pipe) |
console_ui_color
transparent
|
don t set a background color when displaying the console UI | |
|---|---|---|
black
|
default
|
set the console UI s background to black |
http_proxy
URL of an HTTP proxy to use for establishing the tunnel connection. Many HTTP proxies have connection
size and duration limits that will cause ngrok to fail. Like many other networking tools, ngrok will also
respect the environment variable http_proxy if it is set.
Example of ngrok over an authenticated HTTP proxy
http_proxy: "http://user:password@proxy.company:3128"inspect_db_size
| positive integers | size in bytes of the upper limit on memory to allocate to save requests over HTTP tunnels for inspection and replay. | |
|---|---|---|
0
|
default
|
use the default allocation limit, 50MB |
-1
|
disable the inspection database; this has the effective behavior of disabling inspection for all tunnels |
log_level
Logging level of detail. In increasing order of verbosity, possible values are:crit,warn,error,info,debug
log_format
Format of written log records.
logfmt
|
human and machine friendly key/value pairs | |
|---|---|---|
json
|
newline-separated JSON objects | |
term
|
default
|
custom colored human format if standard out is a TTY, otherwise same as logfmt |
log
Write logs to this target destination.
stdout
|
write to standard out | |
|---|---|---|
stderr
|
write to standard error | |
false
|
default
|
disable logging |
| other values | write log records to file path on disk |
log: /var/log/ngrok.logmetadata
Opaque, user-supplied string that will be returned as part of the ngrok.com API response to the List Online Tunnels resource for all tunnels started by this client. This is a useful mechanism to identify tunnels by your own device or customer identifier. Maximum 4096 characters.
metadata: bad8c1c0-8fce-11e4-b4a9-0800200c9a66region
Choose the region where the ngrok client will connect to host its tunnels.
us
|
default
|
United States |
|---|---|---|
eu
|
Europe | |
ap
|
Asia/Pacific | |
au
|
Australia |
root_cas
The root certificate authorities used to validate the TLS connection to the ngrok server.
trusted
|
default
|
use only the trusted certificate root for the ngrok.com tunnel service |
|---|---|---|
host
|
use the root certificates trusted by the hosts operating system. You will likely want to use this option to connect to third-party ngrok servers. | |
| other values | path to a certificate PEM file on disk with certificate authorities to trust |
socks5_proxy
URL of a SOCKS5 proxy to use for establishing a connection to the ngrok server.
socks5_proxy: "socks5://localhost:9150"tunnels
A map of names to tunnel definitions. See Tunnel definitions for more details.
update
true
|
automatically update ngrok to the latest version, when available | |
|---|---|---|
false
|
default
|
never update ngrok unless manually initiated by the user |
update_channel
The update channel determines the stability of released builds to update to. Use 'stable' for all production deployments.
stable
|
default
|
channel |
|---|---|---|
beta
|
update to new beta builds when available |
web_addr
Network address to bind on for serving the local web interface and api.
| network address | bind to this network address | |
|---|---|---|
127.0.0.1:4040
|
default
|
default network address |
false
|
disable the web UI |
Using ngrok with …
Wordpress
To make ngrok work properly with Wordpress installations you usually need to do two things:
- You must ensure that Wordpress issues relative URLS. You can do so by installing one of the following plugins
- https://github.com/optimizamx/odt-relative-urls
- http://wordpress.org/plugins/relative-url/
- http://wordpress.org/plugins/root-relative-urls/
-
You must ensure that Wordpress understands that it is meant to serve itself from your tunneled hostname. You can configure
Wordpress to do that by modifying your `wp-config` to include the following lines:
define('WP_SITEURL', 'http://' . $_SERVER['HTTP_HOST']);
define('WP_HOME', 'http://' . $_SERVER['HTTP_HOST']);
Virtual hosts (MAMP, WAMP, etc)
Popular web servers such as MAMP and WAMP rely on a technique popularly referred to as 'Virtual Hosting' which means that they consult the HTTP requests Host
header to determine which of their multiple sites they should serve. To expose a site like this it is possible to ask ngrok to rewrite the Host header
of all tunneled requests to match what your web server expects. You can do this by using the -host-header option (see: Rewriting the Host header)
to pick which virtual host you want to target. For example, to route to your local site myapp.dev, you would run:
ngrok http -host-header=myapp.dev 80Visual Studio / IIS Express
Use dproterho s visual studio extension which adds ngrok support directly into Visual Studio: ngrok extension for Visual Studio
An outbound proxy
ngrok works correctly through an HTTP or SOCKS5 proxy. ngrok respects the standard unix environment variable http_proxy. You may also set proxy
configuration explicitly in the ngrok configuration file:
node.js
Use bubenshchykov s npm package for interacting with ngrok from node.js:
Puppet
Use gabe s puppet module for installing and configuring ngrok resources and ensure the ngrok client process is running: ngrok module for Puppet
Troubleshooting
CORS with HTTP basic authentication
Yes, but you cannot use ngrok's -auth option. ngrok's http tunnels allow you to specify basic authentication credentials to protect your tunnels. However, ngrok enforces this policy on *all* requests, including the preflight OPTIONS requests that are required by the CORS spec. In this case, your application must implement its own basic authentication. For more details, see this github issue.
ngrok Client API
The ngrok client exposes a REST API that grants programmatic access to:
- Collect status and metrics information
- Collect and replay captured requests
- Start and stop tunnels dynamically
Base URL and Authentication
| Base URL | http://127.0.0.1:4040/api
|
|---|---|
| Authentication | None |
The ngrok client API is exposed as part of ngrok s local web inspection interface. Because it is served on a local interface,
the API has no authentication. The Base URL will change if you override web_addr in your configuration file.
Access the root API resource of a running ngrok client
curl http://localhost:4040/api/Supported Content Types
Request parameters must be encoded to the API using application/json.
Ensure that your client sets the request s Content-Type header appropriately.
All responses returned by the API are application/json.
Versioning and API Stability
The ngrok client API guarantees that breaking changes to the API will never be made unless the caller explicitly opts in to a newer version. The mechanism by which a caller opts into a new version of the API will be determined in the future when it becomes necessary. Examples of non-breaking changes to the API that will not be opt-in include the following.
- The addition of new resources
- The addition of new methods to existing resources
- The addition of new fields on existing resource representations
- Bug fixes which change the API to match documented behavior
List Tunnels
Returns a list of running tunnels with status and metrics information.
Request
Response
Parameters
tunnels
|
list of all running tunnels. See the Tunnel detail resource for docs on the parameters of each tunnel object |
|---|
Example Response
{
  "tunnels": [
      {
          "name": "command_line",
          "uri": "/api/tunnels/command_line",
          "public_url": "https://d95211d2.ngrok.io",
          "proto": "https",
          "config": {
              "addr": "localhost:80",
              "inspect": true,
          },
          "metrics": {
              "conns": {
                  "count": 0,
                  "gauge": 0,
                  "rate1": 0,
                  "rate5": 0,
                  "rate15": 0,
                  "p50": 0,
                  "p90": 0,
                  "p95": 0,
                  "p99": 0
              },
              "http": {
                  "count": 0,
                  "rate1": 0,
                  "rate5": 0,
                  "rate15": 0,
                  "p50": 0,
                  "p90": 0,
                  "p95": 0,
                  "p99": 0
              }
          }
      },
      ...
  ],
  "uri": "/api/tunnels"
}
Start tunnel
Dynamically starts a new tunnel on the ngrok client. The request body parameters are the same as those you would use to define the tunnel in the configuration file.
Request
Parameters
Parameter names and behaviors are identical to those those defined in the configuration file. Use the tunnel definitions section as a reference for configuration parameters and their behaviors.
Example request body
{
  "addr": "22",
  "proto": "tcp",
  "name": "ssh"
}
Response
201 status code with a response body describing the started tunnel. See the Tunnel detail resource for docs on the parameters of the response object
Example Response
{
  "name": "",
  "uri": "/api/tunnels/",
  "public_url": "tcp://0.tcp.ngrok.io:53476",
  "proto": "tcp",
  "config": {
      "addr": "localhost:22",
      "inspect": false,
  },
  "metrics": {
      "conns": {
          "count": 0,
          "gauge": 0,
          "rate1": 0,
          "rate5": 0,
          "rate15": 0,
          "p50": 0,
          "p90": 0,
          "p95": 0,
          "p99": 0
      },
      "http": {
          "count": 0,
          "rate1": 0,
          "rate5": 0,
          "rate15": 0,
          "p50": 0,
          "p90": 0,
          "p95": 0,
          "p99": 0
      }
  }
}
Tunnel detail
Get status and metrics about the named running tunnel
Request
Response
Example Response
{
  "name": "command_line",
  "uri": "/api/tunnels/command_line",
  "public_url": "https://ac294125.ngrok.io",
  "proto": "https",
  "config": {
      "addr": "localhost:80",
      "inspect": true,
  },
  "metrics": {
      "conns": {
          "count": 0,
          "gauge": 0,
          "rate1": 0,
          "rate5": 0,
          "rate15": 0,
          "p50": 0,
          "p90": 0,
          "p95": 0,
          "p99": 0
      },
      "http": {
          "count": 0,
          "rate1": 0,
          "rate5": 0,
          "rate15": 0,
          "p50": 0,
          "p90": 0,
          "p95": 0,
          "p99": 0
      }
  }
}
Stop tunnel
Stop a running tunnel
Request
Response
204 status code with an empty body
List Captured Requests
Returns a list of all HTTP requests captured for inspection. This will only return requests
that are still in memory (ngrok evicts captured requests when their memory usage exceeds inspect_db_size)
Request
Query Parameters
limit
|
maximum number of requests to return |
|---|---|
tunnel_name
|
filter requests only for the given tunnel name |
Example Request
curl http://localhost:4040/api/requests/http?limit=50Response
requests
|
list of captured requests. See the Captured Request Detail resource for docs on the request objects |
|---|
Example Response
{
  "uri": "/api/requests/http",
  "requests": [
      {
          "uri": "/api/requests/http/548fb5c700000002",
          "id": "548fb5c700000002",
          "tunnel_name": "command_line (http)",
          "remote_addr": "192.168.100.25",
          "start": "2014-12-15T20:32:07-08:00",
          "duration": 3893202,
          "request": {
              "method": "GET",
              "proto": "HTTP/1.1",
              "headers": {
                  "Accept": [
                      "*/*"
                  ],
                  "Accept-Encoding": [
                      "gzip, deflate, sdch"
                  ],
                  "Accept-Language": [
                      "en-US,en;q=0.8"
                  ],
                  "Connection": [
                      "keep-alive"
                  ],
                  "User-Agent": [
                      "Mozilla/5.0 (Macintosh; Intel Mac OS X 10_9_5) AppleWebKit/537.36 (KHTML, like Gecko) Chrome/39.0.2171.71 Safari/537.36"
                  ],
                  "X-Original-Host": [
                      "c159663f.ngrok.io"
                  ]
              },
              "uri": "/favicon.ico",
              "raw": ""
          },
          "response": {
              "status": "502 Bad Gateway",
              "status_code": 502,
              "proto": "HTTP/1.1",
              "headers": {
                  "Content-Length": [
                      "1716"
                  ]
              },
              "raw": "",
          }
      },
      ...
  ]
}
Replay Captured Request
Replays a request against the local endpoint of a tunnel
Request
Parameters
id
|
id of request to replay |
|---|---|
tunnel_name
|
name of the tunnel to play the request against. If unspecified, the request is played against the same tunnel it was recorded on |
Example Request
curl -H "Content-Type: application/json" -d '{"id": "548fb5c700000002"}' http://localhost:4040/api/requests/httpResponse
204 status code with an empty body
Delete Captured Requests
Deletes all captured requests
Request
Response
204 status code with no response body
Captured Request Detail
Returns metadata and raw bytes of a captured request. The raw data is base64-encoded in the JSON response.
The response value maybe null if the local server has not yet responded to a request.
Request
Response
Example Response
{
  "uri": "/api/requests/http/548fb5c700000002",
  "id": "548fb5c700000002",
  "tunnel_name": "command_line (http)",
  "remote_addr": "192.168.100.25",
  "start": "2014-12-15T20:32:07-08:00",
  "duration": 3893202,
  "request": {
      "method": "GET",
      "proto": "HTTP/1.1",
      "headers": {
          "Accept": [
              "*/*"
          ],
          "Accept-Encoding": [
              "gzip, deflate, sdch"
          ],
          "Accept-Language": [
              "en-US,en;q=0.8"
          ],
          "Connection": [
              "keep-alive"
          ],
          "User-Agent": [
              "Mozilla/5.0 (Macintosh; Intel Mac OS X 10_9_5) AppleWebKit/537.36 (KHTML, like Gecko) Chrome/39.0.2171.71 Safari/537.36"
          ],
          "X-Original-Host": [
              "c159663f.ngrok.io"
          ]
      },
      "uri": "/favicon.ico",
      "raw": ""
  },
  "response": {
      "status": "502 Bad Gateway",
      "status_code": 502,
      "proto": "HTTP/1.1",
      "headers": {
          "Content-Length": [
              "1716"
          ]
      },
      "raw": "",
  }
}
Backwards Compatibility
ngrok makes promises about the compatibility and stability of its interfaces so that you can can confidently build integrations on top and know what changes to expect when upgrading to newer versions.
Compatibility promise
- Point Release (2.0.0 -> 2.0.1) - ngrok promises no breaking changes across point releases
- Minor Version Change (2.0 -> 2.1) - ngrok may make small changes that break compatibility across a minor version change. ngrok promises that any breaking change will be preceeded by a release that warns about the behavior that will be changed or deprecated.
- Major Version Change (2.0 -> 3.0) - ngrok makes no promise that any interfaces are stable across a major version change.
What interfaces are subject to the promise?
- The ngrok command line interface: the commands and their options
- The ngrok configuration file
- The ngrok client API
Anything other interface like the logging format or the web UI is not subject to any compatibility promise and may change without warning between versions.
Changes in 2.2
The ngrok client API no longer accepts application/x-www-form-urlencoded request bodies. In practice, this only affects the /api/requests/http/:id endpoint because posting to the /api/tunnels endpoint with this type of request body previously caused ngrok to crash.
This change was made to help protect against maliciously crafted web pages that could cause a user to inadvertantly interact with their local ngrok API.
Changes in 2.1
Behavior changes for http and tls tunnels defined in the configuration file or started via the API that do not have
a subdomain or hostname property.
tunnels:
  webapp:
  proto: http
  addr: 80
Given this example tunnel configuration, behavior will change in the following ways.
Old Behavior
Starts a tunnel using the name of the tunnel as the subdomain resulting in the URL http://webapp.ngrok.io
New Behavior
Starts a tunnel with a random subdomain, for example a URL like http://d95211d2.ngrok.io
How to keep the old behavior
Add a subdomain property with the same name as the tunnel:
tunnels:
  webapp:
  proto: http
  addr: 80
  subdomain: webapp
This behavior changed in order to make it possible to launch tunnels with random domains. This was preventing the use of the configuration file and client API to free tier users.
ngrok 1.x sunset
The ngrok 1.X service shut down on April 4, 2016. More details can be found on the ngrok 1.x sunset announcement
FAQ
What information is stored about my tunnels?
ngrok does not log or store any data transmitted through your tunneled connections. ngrok does log some information about the connections which are used for debugging purposes and metrics like the name of the tunnel and the duration of connections. For complete end-to-end security, use a TLS tunnel.
How do I pronouce ngrok?
en-grok
